rids.verify@gmail.com
+91-9555-581-581 | 9401677773
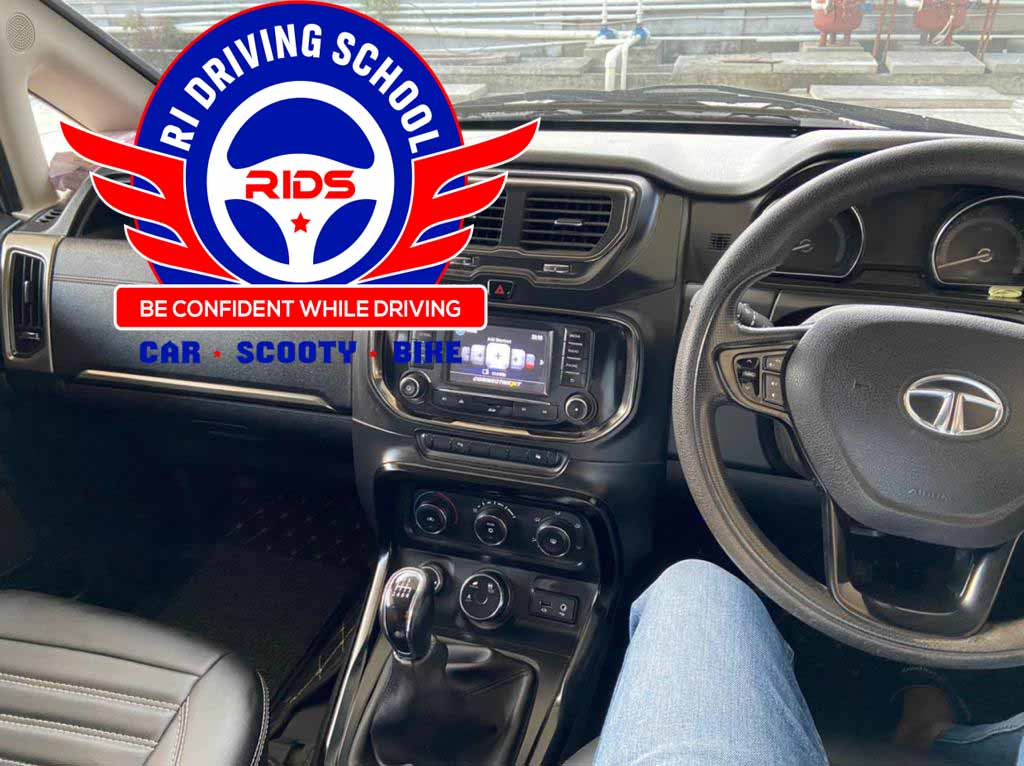
Vehicle Controls
Vehicle Controls
All vehicle controls can be classified as:
1. Foot Controls 2. Hand Controls 3. Visual Controls
Foot Controls
Essentially all manual transmission cars will have three foot controls:
Accelerator
Increases or decreases the speed of the vehicle. This is operated by right foot of the driver. Pressing it down will increase the speed of engine and relieving it will reduce the engine speed. Accelerator control is critical as slight pressure on it will increase speed of engine or car very rapidly that it may go out of control. To control its movement one should support heel on floor and operate it with toe. To smoothly control accelerator one would require good practice on the car.

Brake Pedal
Is used to reduce speed of vehicle or to bring the vehicle to a stop. This pedal is also operated by right foot. More you press the pedal, the braking effort increases. Since this pedal needs to be used in emergency, to apply brake quickly one has to lift foot from accelerator & press with force. Never switch off engine to stop the vehicle as it will render power assisted brake useless - brakes will fail.
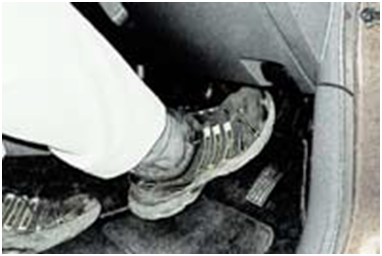
Clutch Pedal
To engage or disengage transmission from engine during gear changes & stopping of vehicle. This pedal is operated always by left foot, keep heel on floor and use it as a pivot to operate pedal with the toe. Clutch pedal may or may not be power assisted. In case you use automatic transmission only accelerator & brake pedals are there. For both the controls only right foot is to be used. Do not use left foot to operate brake pedal.
Hand Controls
Hand controls as name suggest are the controls which are controlled by driver’s hands such as:
1. Steering Wheel
The most commonly recommended method of holding steering wheel is with both the hands on Quarter to three or Ten to Two as per your convenience. As far as possible hold the steering wheel with both the hands except occasionally when you have to shift gears or have to use other hand control for a very brief period. Hold the steering firmly gripping it with fingers and thumbs. Do not hold the steering with fingers and thumb rolled around the wheel as this is not a safe practice. In case vehicle hits a boulder or divider etc. the steering wheel may rotate with wiper control etc. With crossed hands it will be impossible to use other controls. Holding steering from any other position is dangerous as you will require more force and time to operate steering compared to Quarter to Three position. Do not operate head lamp/turn signal or wiper control switches by inserting your hand from steering spokes. Power steering can be hydraulic or electric. In case engine is switched off power steering will become very hard making it almost inoperable. Great force and may break one of the thumbs. Never cross the hands while turning the steering wheel. You have to use Pull-Push method of turning the wheel without loosening the grip on wheel. This will facilitate you to use other controls while steering the vehicle like turn signal,
2. Gear Shift Lever
Manual Transmission “ Generally most of the vehicles will have 5 forward and 1 reverse gear. Some of the vehicles may be equipped with 4 forward and 1 reverse gear. Gears are provided to improve the ability of engine to pull the vehicle. When you want, start rolling the vehicle use 1st gear. In this position, maximum torque (turning force) will be provided to wheels. As the vehicle speeds up one starts shifting to higher gears. Higher gear ensure that engine moves slowly thus giving more mileage from each litter /kg of fuel consumed. Use 5th gear (overdrive gear) at speeds above 40kmph. Avoid overtaking or accelerating in 5th gear as engine will have very little torque. Shift to lower gear, accelerate and come quickly to 5th gear again. During downshift ensure that you do not shift to lower gear at very high speeds this action may damage engine and gearbox. Avoid shifting to 1st gear while downshifting as it will reduce the life of synchronizer. Automatic Transmission “In case of automatic transmission the lever will have a knob attached to it, lever will not move till you press this knob. You can use D position and gears will change automatically as per pre-defined program. Alternatively you can select 1st, 2nd or 3rd or higher gear as per your speed requirement, if equipped.
3. Parking Brake Lever
Parking brake lever is mounted between the front seats. This is used to secure the vehicle against accidental rolling while parking or stopping the vehicle. Parking brake lever is operated by pulling up the lever. To release the parking brake one has to pull the lever up a little and press the knob with thumb and release down. This will release the brake from wheels. Contrary to its name, parking brake should be applied all times when you stop the vehicle more than few seconds on the road e.g. on traffic signals. This ensures your vehicle does not roll accidentally as most of the roads are not plane but have a little slope. Always make it a practice to release parking brake every time you start to move.
4. Head lamp/Parking Light Switch & Fog Lamp
This lever is on the right side of the steering wheel to switch on parking lamp, head lamp in main or dipped position. Fog lamps are also operated by a ring on the lever. Turn signals are also operated by moving this lever up (for left turn) or down (for right turn).
5. Wiper Switch
Is used to switch on/off windshield wipers at various speeds like intermittent, slow and fast speed. By pulling it towards you wiper spray gets activated on windshield. Some cars are also equipped with variable speed intermittent position.
6. Horn
Switch is normally positioned in centre of steering wheel, in some cases switch may be on spokes also. With horn, you can warn others to avert potential hazardous situation.
7. Hazard Lamp Switch
This switch is used to switch on hazard lights whenever you want to park your vehicle on the road which may be hazardous to others. The switch may be located on steering column or the dash board.
8. Mirrors
All vehicles are equipped with inside rear view mirror. Some vehicles may be equipped with day/night mirror –advantage of this mirror is the driver need not worry about glare. Outside rear view mirror is normally on right side of the door while some cars will be equipped with left side mirror as well. These mirrors aid you in driving safely by apprising you of traffic around you. Adjustment of mirrors can be manual/internal or remote.
9. Turn Indicators
These are signals to other road users to inform them of your intended action on road.
10. Ignition Switch
Ignition switch helps you start/ stop the engine. This can be operated by key or some cars may have push button start switch.
11. Demisters
Demisting is the function to remove mist that collects on the glasses on the inside in cold/rainy weather. Demister on the rear glass is a heating element built into the glass to evaporate the moisture. To remove mist from front windshield and other glasses you can position the louvers and switching on the heater.
Visual Controls
Instrument Panel – Some of these indicators may or may not be present in your car depending on variant and fuel option. Refer your car’s Owner’s Manual.
1. Speedometer
Indicates speed in kmph.
2. Odometer
Records total distance covered by the vehicle.
3. Trip Meter
Records distance covered in a trip, can be reset by pressing of the knob. Some models are equipped
with up to three different trip meters.
4. Tachometer
Indicates engine speed in RPM (Revolutions per Minute) – this helps you save fuel and guides when
to change gears at most appropriate speed.
5. Fuel Gauge
Indicates amount of fuel left in the tank. It can be analog or digital.
6. Temperature Gauge
Indicates temperature of engine coolant. In case engine temperature goes up it is indicated by needle going towards H mark or temperature lamp lights
up.
7. Oil Pressure Lamp
Indicates insufficient oil pressure. If this lamp comes
on, switch off the engine immediately as it may result
in engine seizure.
8. Parking Brake/Brake Fluid Warning Lamp
This lamp warns of either the parking brake is engaged or the brake fluid level has gone down. If parking brake is disengaged check the brake fluid level, top up if necessary.
9. Battery Charging Light
Indicates charging system is not working. Can also
be a result of fan belt breakage. Vehicle can be driven but get it repaired urgently.
10. Turn cum Hazard Light Indicators
Indicate if a turn signal or hazard warning switch is on.
11. High Beam Indicator Lamp
Indicates headlamp is on in high beam. In cities with
street lighting, main beam should not be switched
on as it may dazzle the eyes of oncoming drivers.
12. Warm-up Coil Indicator
You should not try to crank a diesel engine as long
as this lamp is on.
13. Water in Fuel Filter
Indicates presence of water in fuel. Immediately
drain the water.
14. Service Vehicle Soon (SVS) Lamp
Get the vehicle checked by workshop.
15. Power Steering Fault Indicator
Indicates some problem with power steering system.
16. Engine Malfunction Indicator Lamp
If this lamp lights up it indicates problem with one
of the engine sensors. Take the vehicle to workshop as early as possible.
17. Air Bag Fault
If this lamp does not go off indicates problem with
air bag, contact workshop immediately.
18. Immobilizer System
If this light blinks, then your vehicle will not start,
you have to contact workshop.
19. Driver Seat Belt Reminder
This lamp lights up when you do not buckle up
safety belt and try to start the vehicle.
20. ABS Warning Lamp
If this lamp comes on it indicates problem in ABS
system. Now the system will work as ordinary
brake system without ABS.
21. Door Open Warning Lamp
If any of the door is open this indicator will come on.
22. Rear Fog Light Indicator
This comes on when rear fog lamp is switched on.